These were in FamilyFun magazine, and I thought they would be cute for all of you spending your new years eve's with your little ones :)
All you need is:
- Sugar cones
- Chocolate frosting
- Snowcaps (candy)
- Colored tubes of frosting to write "2012"
Happy New Year! adult recipes to come ...
~Sizza
Wednesday, December 28, 2011
Top 10 of 2011
Here's a roundup of our most popular recipes of 2011! There were quite a few favorites for our holiday recipes but they can easily be adapted to use throughout the winter season. Drum roll please!
And the #1 is......
Thanks to all who enjoy all of our inspirations! Looking forward to a New Year of new ideas and delicious recipes!
The Six~
Friday, December 23, 2011
Easy Bacon Rollups
My Christmas
menu is set but I am still trying to gather some last minute ideas for
appetizers. Bacon is always a crowd pleaser. Typically I splurge
with scallops wrapped in bacon but my mom isn't a fish/shellfish
person....these will be the perfect fill in for those who don't dig the
scallop! This year I will make 1/2 wrapped in bacon and 1/2 like
this.....both will be delicious!
Ingredients:
- 6 oz cream cheese with chives, softened
- 1 tbl milk or mayonnaise
- 25 slices of bread, sliced in half
- 25 slices of bacon, sliced in half
- parsley sprigs (optional)
Directions:
- Combine cream cheese with milk or mayonnaise until smooth and spreadable.
- Spread 1 tsp of cream cheese over the half piece of bread. Roll the bread tightly from the smallest end.
- Wrap the bacon around the rolled bread and secure with a toothpick.
- Place on broiler pan and bake 350 for 30 minutes.
- Garnish with parsley if desired.
* These can be made ahead of time and frozen before cooking. To serve, remove from freezer and thaw overnight in fridge. Bake at 350 degrees for 30 minutes.
Lucy~
Sunday, December 18, 2011
Santa Hat Chex Mix
Cookiesn'cups invented the most adorable little santa hats made out of Bugles dipped in red dyed white chocolate. I have to share this great "holiday" version of chex mix with you all...
For Step 1, You'll Need:
1 box of Bugles
Small white sprinkles
Mini-marshmallows
White Melting chocolate
Red Food Coloring
Wax Paper
Directions:
For Step 2, You'll Need:
Looking forward to making a batch of these this weekend!
Sizza
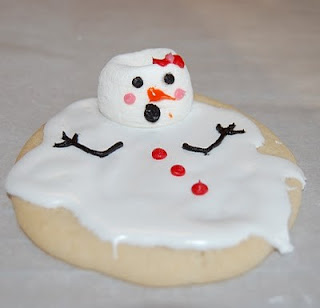
CREDIT: Cookiesncups |
For Step 1, You'll Need:
1 box of Bugles
Small white sprinkles
Mini-marshmallows
White Melting chocolate
Red Food Coloring
Wax Paper
Directions:
- Melt Chocolate, add 5 drops food coloring.
- Dip Bugle in, then Dip bottom (open part) into white sprinkles.
- Add 1 mini-marshmallow on top.
For Step 2, You'll Need:
3 cups mini pretzels
1/2 cup craisins
1 cup salted dry roasted peanuts
2 cups Rice Chex
2 cups holiday colored M+M’s
8 oz. white chocolate for melting
Directions:
- Spread all your ingredients, EXCEPT M&M’s, out on a baking sheet lined with parchment or wax paper.
- Melt your white chocolate according to package directions and drizzle over the pretzel mix.
- Transfer into a large bowl and coat mix with chocolate.
- Gently add in m+ms & Santa Ha Bugles
Looking forward to making a batch of these this weekend!
Sizza
Friday, December 16, 2011
Homemade Bailey’s Irish Cream
I am one for homemade liquors. They are surprisingly easy to
make, great to drink and people love getting a bottle as a gift. Here's
my homemade Bailey’s Irish Cream, the longer it sits the smoother it gets!
I have also lightened up the recipe a bit. If you choose you can
use cream or whole milk and full fat sweetened condensed milk. However, I
was pleasantly surprised with the flavor and creaminess of the lighted up
version!
Ingredients:
1 cup 1 % milk
1 (14 oz) fat free
sweetened condensed milk
1 2/3 Irish
Whiskey
1 tsp instant
coffee
2 tbl chocolate
syrup
1 tsp vanilla
extract
1 tsp almond
extract
Place all
ingredients in a large bowl or blender and whisk or blend until well
incorporated. This will make 4 cups of Irish Cream.
Enjoy!
Lucy~
Sunday, December 11, 2011
Chocolate, Pretzel Christmas Buttons
These little treats hit the spot! Sweet and Salty!
Ingredients:
Directions:
Christmas Buttons Recipe
Ingredients:
Small Pretzels
Hershey Kisses (unwrapped)
M&M's
Directions:
Top each pretzel with a Hershey's Kiss, and place in a preheated 200ºF oven for about 6 - 9 minutes. (You'll know they are ready when the m&m push in easily) Remove and immediately press an M&M into the top of each kiss. Let cool completely!
Saturday, December 10, 2011
Brownie and Strawberry Santa Hats
These little Santa Hats are so tasty.
You'll Need:
Strawberries - cleaned and trimmed
Brownie mix of your choice
Vanilla frosting of your choice
Directions:
Once brownies are cooked and cooled, using a round cookie cutter, cut out circles for the base of the dessert. Spread a round circle of frosting for the Santa hat trim. Place strawberry on frosting and top of the Santa hat!
Hope you have as much fun making these as we did!
- The Six
Thursday, December 08, 2011
Eggnog Pound Cake
Do you know anyone who doesn't LOVE pound cake?! I happen to love pound cake and this recipe caught my eye since I love Eggnog too and to top it off, it has a little bit of Rum in it as well!!
Here is what you will need ..
- Gigi
Here is what you will need ..
- 1 cup granulated sugar
- 1/2 cup softened butter (not melted but can zap it in the micro for 15 secs if right out of fridge)
- 2 tablespoons Rum (you favorite Rum and you can add more or less for taste)
- 1 teaspoon rum extract
- 1 teaspoon vanilla extract
- 5 egg yolks
- 1 3/4 cups all-purpose flour
- 2 teaspoons baking powder
- 1/2 teaspoon salt
- 1/2 teaspoon ground nutmeg
- 3/4 cup whole milk
Directions ...
1. Preheat Oven to 350 degrees
2. Grease and flour 1 loaf pan
3. Combine sugar, butter, rum, rum extract, vanilla and egg yolks in large
mixing bowl; beat with electric mixer until completely combined.
4. Gradually add in flour, baking powder, salt and nutmeg,and milk.
5. Pour batter
into already greased and floured loaf pan.
6. Bake at 350° for 50 to 60 minutes.
- Gigi
Wednesday, December 07, 2011
No mantle, no problem!
Not every house has a mantle, or fireplace, to hang the stockings by with care. I don't even have a staircase, nevermind one with a railing, which is a common alternative. So I did the best I could with what I do have, and I must say, I was rather pleased!
The white shelves I hung shortly after moving in (a great deal at Kohls), to place pictures on. Last Christmas, I traded the picture frames for stocking holders. This year, I added a bow on the mirror, to bring a bit more Christmas to my makeshift mantle.
Naturally, I made the bow... which I'm sure you could have guessed by now, knowing me as well as you do!
Where do you hang your stockings? Let us know and post pics on our Facebook page!
Cheers!
~ Glory :0)
Naturally, I made the bow... which I'm sure you could have guessed by now, knowing me as well as you do!
Where do you hang your stockings? Let us know and post pics on our Facebook page!
Cheers!
~ Glory :0)
Bailey's Homemade Brownies (Mrs. Claus's favorite)
I've been calling myself Mrs. Claus around the house lately. Yes, in third person. I get a kick out of it, even if no one else does.
"Mrs. Claus is packing on the pounds this year, geez."
"Mrs. Claus needs a drink."
So when Mrs. Claus saw this recipe for brownies with Baileys irish creme, I was in.
"Mrs. Claus is packing on the pounds this year, geez."
"Mrs. Claus needs a drink."
So when Mrs. Claus saw this recipe for brownies with Baileys irish creme, I was in.
Photo: http://www.flickr.com/photos/satmandu/2751861088/ |
You'll Need:
1 stick unsalted butter
3 squares baking chocolate
2 cups sugar
2 eggs
1 cup flour
1 teaspoon vanilla
1/4 cup Bailey’s Irish Cream Liqueur
Note: you can also use brownie mix, and add 1/4 Baileys.
Photo: http://www.flickr.com/photos/ivypics/4256759309/ |
Directions:
- Preheat oven to 350.
- Melt butter and baking sqaures in a
microwave safe bowl.
- In the mixing bowl, cream melted butter and
chocolate mixture.
- Add in sugar and vanilla and beat until fluffy, about
2-3 minutes.
- Add in eggs, beating one at a time.
- Add flour and stir
just until combined.
- Stir in Bailey’s. *
- Pour into greased 9 x 13 baking dish (I used a 10 x 10 square cake pan).
- Bake for 35-45 minutes, or until just barely done.
* = most important step
Enjoy all you other Mrs. Clauses.
Tuesday, December 06, 2011
Santa Hat Pretzels
What could be better than chocolate & pretzels....the perfect sweet treat and you only need a couple to satisfy your sweet tooth (that is if you can stop yourself)!
You'll Need
- Mini Twist Pretzels
- White Chocolate Almond Bark
- Red sugar or jimmies (sprinkles)
- Mini Marshmallows
Directions
- Melt almond bark according to the package directions.
- Dip each pretzel into the chocolate so one half is covered in the chocolate.
- Dip the chocolate covered pretzel into the sprinkles or red sugar and place on wax paper.
- Cut the mini marshmallows in half. Use leftover melted chocolate to stick the mini marshmallow onto the side of each pretzel. Allow time for the almond bark to set.
Lucy~
Sunday, December 04, 2011
Farmhouse Coffee Christmas Giveaway
Comment below and tell us about your favorite Christmas morning tradition and be automatically entered to win a pound of delicious Farmhouse blend coffee from Cumberland Farms & a reusable to-go cup!
And the Winner is...Joy Hicks!
Thank you all for sharing your Christmas morning traditions, we loved them all!
Good luck!
- The Six
And the Winner is...Joy Hicks!
Thank you all for sharing your Christmas morning traditions, we loved them all!
Good luck!
- The Six
Holiday Decorating
Typically, I'm the type of person who decorates Thanksgiving weekend. But with the unseasonably warm weather New England was having, I found it difficult to get into gear to decorate for Christmas. But I finally got my head in gear and started decorating yesterday.
I'm all for inexpensive decorations, especially those that make an appearance for only a few weeks each year. This year, I supplemented store bought decorations I already had with some that I put together myself. Here's the first of a few Christmas Decorations and tips...
Plain garland can go a long way, and is relatively inexpensive. I purchased 9 feet of plain garland for around $4 at Michael's. In an apartment, 9 feet of garland can go a long way! So far, I've used it for my backdoor. The sprigs (acorn and snow decorations) I purchased at Michael's as well, for just a couple dollars. The bow I made myself, out of ribbon I bought in bulk. Overall, this entire decoration cost me around $5!! Try spending that in a store for 2 feet of decorated garland...
So many people say to me, I could never make a bow... I was in the same boat a few years ago. Now, I can whip up a bow in many different shapes and sizes in minutes! The key is to learn what method works best for you. I started using everything I could - glue gun, wire - even a stapler! Have your children join in - their little fingers are great for pinching ribbon while you secure it. After a couple years of practice (yes, years because how often are you making a bow? I certainly wasn't making one everyday!), I can now whip up a decent looking bow with just ribbon and wire. One thing I always look for is wired ribbon. It makes it so much easier to get the ribbon to do what you want, and it keeps its form year after year, with just a little fluffing when it's first unpacked.
Show us some of your holiday decorations on our Facebook page - and share any tips and tricks you might have as well!
Cheers!
~ Glory :0)
Subscribe to:
Posts (Atom)